Cannabis growing techniques
This guide is provided for informational and educational purposes only. We do not encourage you to break the law and cannot claim any responsibility for your actions. |
This article will cover how to cultivate Marijuana in an indoors environment.
Setting up Growing Environment
To save electricity, use adjustable spectrum LED lights.
The best way to get an environment going is with an all in All In One Grow Tent. This should include everything you'll need to grow, lights, filter, fans, timer, temp/humidity gauge, ducting, etc. All you'll need is a place to put it an access to water.
Sourcing Seeds
If you already buy weed you can buy bud with seeds still in the mix. Ask your dealer or buy seeds from Deep Web Marketplaces. If you're getting it shipped to you don't use your real address! Use a PO box not under your name or a for-sale house near you.
Be aware of what kind of seeds your buying! Different strains are DIFFERENT SEEDS and they grow different too. Indigas and Sativas vary in height, and some seeds are auto-flowering. This is a general guide and will work for all strains, but do a little research on the seeds you'll be using so you can account for space/height/water requirements before it becomes an issue.
Germination
- Select the largest seeds and place them between two heavy-duty napkins or ink blotters in a pan.
- Soak the napkins with water until completely saturated.
- Cover the top of the pan or place it in a dark closet for three days or until a sprout about a half inch long appears from most of the seeds.
During this period, you can prepare the seedling bed:
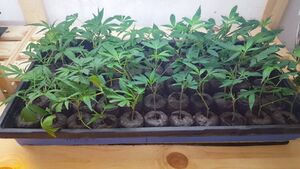
- Use a low wooden box such as a tomato flat and fill it with an inch of gravel.
- Fill the rest of the box with some soil mixed with a small amount of fertilizer.
- Moisten the soil until water seeps out the bottom of the box, then level the soil making a flat surface.
- With a pencil, punch holes two inches apart in straight rows. You can get about 2 dozen in a tomato flat.
When the germination period is over, take those seeds that have an adequate sprout and plant one in each hole. The sprout goes down and the seed part should be a little above ground. Tamp the soil firmly (do not pack) around each plant as you insert the sprouts. They should receive enough water during this period to keep the soil moist. By the time they are ready to go into the ground, the plants should be about six to eight inches tall.[1]
Planting
After your plants are done being incubated its time to transfer them to full size pots.
A simple loose and airy soil mix in 3-5 gallon buckets are great for beginners and much more forgiving than any hydroponic system. Be sure to cut holes in the bottom of the buckets and use saucers under them to catch any overflow. You’ll need to purchase nutrients to feed to your plants as they grow and a watering can as well.
- Lower your reflector so that it’s closer to the plants rather than making them stretch to reach for light. Raise the lighting system as your plants grow.
- Set your light timer to be on for 18 hours per day and off for 6 hours.
- Continue to water and feed your plants.
Avoid overfeeding and over-watering your plants at all costs. Err on the side of caution as it’s always easier to add more nutrients or water than it is to take them away. Marijuana roots prefer a wet/dry cycle so lift up your buckets and you’ll get a better idea for if they need watering or not by the weight. The first sign of overfed plants is burnt leaf tips.[2]
Pruning
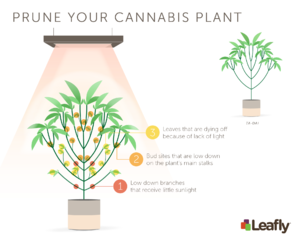
Pruning your plants is optional but if you take the time to do it you will produce a much higher yield of bud.
When pruning, start early and often. Cut or pinch branches just above the node where two new shoots will emerge. If you stay on top of this process, you’ll have plants that look like bonsai bushes, with plenty of bud sites but not a lot of stretching out and big gaps between nodes. This is the efficient way to get bigger yields out of small spaces but your vegetating time will increase so factor that into your schedule.
Don’t prune or pinch plants at all once they’ve begun flowering – you’ll only be decreasing your harvest at that point. If the branches are threatening to reach the light, bend them or tie them down to keep them from burning. A trellis system constructed from chicken wire at canopy level (aka the ScrOG or Screen of Green system), will further spread out bud sites and increase your yields considerably. Simply train growing shoots to grow horizontally along the bottom of the screen to fill empty spots.
Flowering
Since you're growing indoors, the decision of when to induce flowering in your plants is entirely up to you. If you want to learn how to grow weed, it’s important to determine how much space you have and to factor in the fact that your plants will stretch for at least a few weeks after flowering is induced. A good rule of thumb is one week per gallon of container, so a plant in a five-gallon bucket should get approximately five weeks of vegetative time before inducing flowering.
When you’re ready to begin the flowering stage, switch your timer to a 12 hour on / 12 hour off light cycle. Be sure never to interrupt the 12-hour dark period with ANY light. This confuses your plant and can cause serious problems.
Change your feeding regimen to one suited for flowering. Plant nutrients generally come in vegetative or flowering formulations so switch over to a “blooming” solution. Depending on the flowering time of your strain, determine when you have two weeks or so left and begin the flushing process. If you’re growing a 60-day flowering strain, start to flush your grow by using only plain water around day 46.
Flushing
Whether they are grown in soil or a hydroponic medium, cannabis plants can suffer from a build-up of salts or nutrient residues. Many growers flush their plants using plain water every 10 days throughout the grow to help clear out this build-up. When you feed your plants they do not use all of the nutrients that you give them immediately. Some are stored and used later on. But if you continue feeding and your plant never has to use up those reserves, they accumulate and stay in the leaves, stems and buds. If the nutrient mix you are using is not perfectly balanced for your plants’ needs, they can suffer a condition called “nutrient lockout”. The different molecules in nutrients work together. If there is too much of one and not enough of another the plant may become unable to use any of the nutrients or minerals. When nutrient lockout occurs the plants may show deficiency symptoms that do not go away with extra nutrients.
When to flush?
- When you switch nutrients (for example at the start of flowering)
- Every 10-14 days to prevent nutrient lockout
- Before Harvest
How to flush:
To flush marijuana grown in soil you need to run lots of clean water through the system. Many growers use rain water. You can add a flushing agent like Clearex if you prefer, although it is not necessary. pH your water to around 6.2 and run it through the container until you have around 80% - 90% run off. The actual amount will depend on how dry your soil is and how well it is drained, but you should be looking to put through about the same volume of water as the volume of your container.[3]
Determining When to Harvest
Knowing when and how to harvest your buds is as important as knowing how to grow weed.
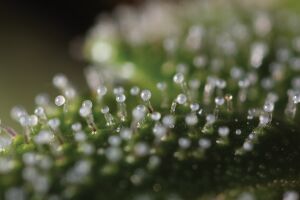
Use a loupe or a strong magnifying scope to take a very close look at the trichomes; the tiny glandular stalk and head sometimes referred to as “crystals”. Up close, they resemble little glass mushrooms with a stem that forms a bulbous round clear top. Inside that gland head resides the psychoactive compounds (THC, CBD etc). Harvest when the majority of the gland heads begin to go cloudy white and before they’ve gone completely amber. You can harvest when they’re mostly amber if you desire a more lethargic stone.
Harvesting
Your harvesting environment should include good air circulation for both trimming and drying rooms. As you will find the odors can be quite strong at this stage. Keep the room around 70 degrees Fahrenheit, heat is not necessary at this stage and only increases odor. Temps over 86 degrees and too much moisture and rough handling will actually decrease your THC potency. Be gentle with your buds from trimming through drying.
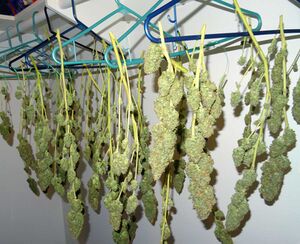
Some growers cut the plant down at the base and hang the whole plant upside down to dry. Others will cut off branches and hang them to dry. Still others will cut off individual buds so they can lay them out and dry them on a mesh screen or rack. Choose whatever method you want. Be sure to trim away as many leaves as you can, at least trim away the big fan leaves.[4]
Drying
Drying your buds is the first part of the curing process, and the most important. When fast-dried the bud will taste bad, smell bad, and leave you with a migraine or paranoia, don't rush the process.
You can dry with the traditional method by taking the whole stem and hanging it upside down to dry, you can use cloth hangers, string, or anything convenient you might have.
When hanging your buds upside down to dry, your buds are ready to be placed in jars when the outsides of all the buds are completely dry to the touch, but not brittle.The bigger stems will still be bendy but the smaller stems will snap when buds are ready to pull down. You should be able to snap off the smallest buds with your fingers without leaving a “string” of plant behind. “Stringiness” means there’s still too much moisture inside.
Curation
Once the drying process is complete, take the buds off the plant and place them into jars. The ideal storage containers for marijuana buds are wide-mouthed glass mason jars. These can be found pretty easily at big grocery stores, most craft stores, online, and at superstores like WalMart.
You want mason jars that hold 1 quart (labeled “Quart jars” or sometimes 32oz jars). Each of these jars will hold about an ounce of dried buds (usually about 0.75-1.25 ounces of bud will fit in one jar, but it can be more or less depending on the consistency of your buds). One-quart glass mason jars have proven to be a great size for proper curing. Bigger jars are more likely to encourage mold so stick with tried and true quart jars.
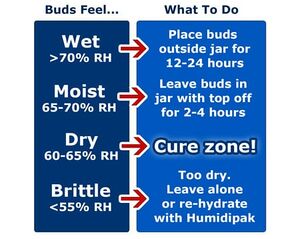
You want to fill each jar 75% full of buds, so there’s still a bit of air at the top. If you shake the jars, you want the buds to be able to move around. If they’re sticking together it means they’re still too wet and you should leave the lids off for a little while to help them dry out.
Open all your jars regularly to inspect and air out your bud. It’s important that you’re checking on your buds at least every 24 hours during the beginning stages. If you smell ammonia or the outside of buds feel moist, it means buds are too wet and need to air out before closing the jars again. If it smells more like cannabis every day, it means you’re doing it right. Feel free to "inspect" your bud during the curation process by smoking it. When your bud is consistently in the "Cure Zone" it can be stored, or smoked.
References
